Ways to Improve Android Battery Life

Android


Whether you’re running stock Android on a Nexus or a customized version on a Galaxy S5, here you will find simple tips and tweaks that will help you to understand more about what’s going on with your device and how to get you more battery life.

What follows is a series of tips to help you get the most out of the battery in your Android smartphone or tablet. Feel free to pick and choose the tips you think will help the most – there’s certainly no need to do everything listed here!

1. Knowledge is power, so the first thing to do is to see what’s sucking at your battery the hardest.

To do this go to Settings > Battery to get a breakdown. From here you’ll be presented with a list of features and applications that are draining your battery the hardest, and if you see a feature or service sucking up a lot of power, you can shut it off.

2. One of the biggest draws on the battery will be the device’s screen. The brighter the screen, the more power it takes. Therefore, by cutting down on the brightness of the screen you can get more time out of your battery.

Go to Settings > Display > Brightness (or swipe down from the top-right and click on Brightness) and turn down the display to a point where it’s just bright enough for you.

While you’re there, you can disable auto brightness.

3. Your Android device is doing a lot behind your back, checking for new emails, tweets, and so forth. All this takes battery life, and if it’s not something that bothers you – maybe you’re content with opening the email or Twitter client to check for messages – then you can disable it.

From Settings choose the account you want to check or change the settings of. Disable the syncing of anything that’s not important to you.

4. The GPS radio is a power-hungry piece of hardware, and if you don’t want to know where you are the whole time you can make a change that will save you some battery life.

Tap Settings > Location > Mode and change the mode to Battery saving.

5. One of the most effective ways of prolonging battery life is to disable the cellular and wi-fi radios, and you can do this easily by putting the device into Aeroplane Mode.

Swipe down from the top-right and tap Aeroplane Mode.

6. I use Battery Widget Reborn because it doesn’t seem to contribute to draining the battery it is monitoring and it has an automatic night time airplane mode setting, but there are loads to choose from (just make sure it doesn’t make the problem worse!).

7. Tap on Settings > Apps and swipe to the left to get to Running.

There you’ll see a list of apps that are currently running and you can tap on each one to see what they’re doing, and you can stop any apps that you don’t need running in the background all of the time.

8. There’s no such thing as something for nothing, so get rid of anything you’re not using or don’t find useful.

Clock on Apps and swipe left to go to Widgets to see what’s installed.

Live wallpapers are a far bigger drain on your device’s battery than static wallpapers, so if you want the most out of your battery, don’t use them.

Tap Settings > Display > Wallpaper to check or change your settings.

9. Since we’ve already ascertained that the screen is one of the biggest drains on a device, it makes sense to not have it on when you’re not using the device. Set it to go to sleep after a short interval.

To do this tap Settings > Display > Sleep to change the interval. I keep it around 15 to 30 seconds.

10. Some devices such as the Samsung Galaxy S5 feature an ultra power saving mode that reduces functionality offered so you get more life out of whatever battery you have left.

Useful if you’re in a power jam, but they reduce functionality dramatically.

11. I charge up my devices when I’m on the move.

If you only have one device then a single output device like this Belkin Universal Car Charger will work ($24.99), but if you have multiple devices then you might want a dual or even triple output charger.

12. Why rely on the battery inside your device when you can carry a spare power pack with you and use this to charge up your device? Anker have a range of packs to suit all needs, from the occasional recharge to recharging multiple devices simultaneously.

Source: Associated Press


Computer Maintenance tips and tools

Computer Maintenance

Computer Maintenance is the practice of keeping computers in a good state of repair. I properly maintained computer can live well beyond its “life expectancy.” Computer Maintenance can come in two forms. The first is by physically cleaning the computer itself and the second is by cleaning the “virtual computer.” The Virtual computer is everything inside your computer, system files, documents, programs, etc. Here is a good list of tips and tools you can use to maintain your computer.

  1. Virus Protection: Install an antivirus program to protect yourself. There are many programs that are available to help protect you from the viruses that are created every day. As long as the program is updated on a regular basis you will find you are taking the right step in the right direction.
  2. Applications: Every application and utility is prone to security risks. The developers of these applications may find a security hole and patch it, if you don’t have the latest version you may find yourself open to an attack. Remove unused programs. If you haven’t used a program in a long time then it’s likely that you don’t need it. Many unused programs can account for free space that is not available to you because you have a program that you installed a year ago.
  3. Clear Temp files and other unnecessary files: When you use the Internet a copy of every web page you visit is stored. This is helpful as it allows for faster viewing later on down the road. Since this is space taken up at least once a month you should consider clearing the temporary internet files, internet history, and cookies off of your system. Here is how to delete this information on the three most used browsers.
  4. Maintain Data Integrity: At least once a month you should check your hard drive for errors by using two simple solutions. The first thing you are going to do is a defragment of the hard drive. By defragging the hard drive you are telling the program to go find all these pieces and put them back together.  By making them whole again and regaining that single file you may even notice that specific file is noticeably faster and other aspects of your computer may speed up as well. The next tool you want to use is a Check Disk. The check disk will look at the disk volumes and see if it finds any problems, if it does it’s going to try to fix them for you.
  5. Backup: How important is your data? The more important your data is to you the more you back it up. Generally a once a month backup solution works for most people. However, all critical files should be backed up as regularly as you change them. There are many programs that allow you to back up your data to either CD’s, jump drives, or online storage. You should review the different options and find what’s best for you.
  6. Windows Updates: Windows pushes out updates on a regular basis. Check your settings within windows to verify you are downloading and installing these updates as they are coming in. Critical windows updates can save you from any issues you may end up experiencing.
  7. Empty Recycle Bin: When you delete something it’s not gone forever it goes to a recycle bin and stays there for a while before it auto deletes or you tell it to remove it forever. Generally this is a really good safe fall. You never know when you may accidentally delete something that you really need and you find it there. Once a month though you should consider reviewing everything that is in there and deleting everything that you will never need again.
  8. Clean the surge protector: For starters if you are not using a surge protector go get one. A surge protector can save your investment in case of a power outage that causes a burst of electricity. If you already have a surge protector check it for any damage a damaged surge protector is just as bad as not having one. If the surge protector has exposed wiring it should be replaced immediately. If the surge protector is in working order then it still needs to be cleaned ensure the plugs that you use to connect your computer are free of dust and debris.

How to keep your PC secure when Microsoft ends Windows XP support

MS Windows

After a legendary dozen year run, Microsoft will stop providing security patches for Windows XP on April 8, 2014. Without Microsoft’s protection, all those WinXP PCs will have targets painted on their hard drives.

Nearly 30 percent of Internet-connected PCs still run Windows XP, and no, they won’t die that day. They’ll continue running like normal, but they’ll be rotting inside, becoming increasingly full of security holes.

You should upgrade from Windows XP right now if at all possible—but not everyone can cut the XP cord so completely. If you can’t upgrade, there are some things you can do to protect yourself. Make no mistake: These tricks are like sticking your finger in a leaking dam. They’ll help a bit, but the dam is crumbling and it’s time to get out of the way.

How to Move from a hard drive to an SSD

harddrive2solidstateThe best way to move an existing Windows installation, along with all of the installed programs, is to clone the drive. But cloning normally copies everything on one drive to the other. That doesn’t work if you have 800GB of files and only 120GB of new storage.

What you need is cloning software smart enough to let you pick what files and folders you don’t want on the new drive.

Such software might come with your SSD. But in my experience, bundled SSD cloning software leaves a lot to be desired. I haven’t tried every such program by a long shot, so if your new SSD comes with cloning software, give it a try. Of course, you’ll have to connect the SSD to your PC.

When the cloning is done, set your PC to boot from the SSD. Keep the old hard drive around, either in the PC or externally in a SATA-USB enclosure, for storing the files you exempted from the cloning and others that won’t fit on the SSD.

Reinstall Windows when you’ve lost your reinstall disc or partition

install now

Every computer sold with Windows pre-installed must come with a tool for reinstalling the operating system. The most common approach puts the restoration tool on a special partition on the hard drive. Some PCs, especially from small manufacturers, come instead with an OEM Windows DVD.

But what do you do if the partition has been lost–either through a hard drive crash or user error? Or what if that DVD has been misplaced?

If you purchased the PC from a major vendor, contact them and ask if they can provide a replacement. These usually come on a DVD or a flash drive. I know for a fact that Lenovo, Dell, and HP offer this service for a small fee.

Another option that might work: See if you can borrow a Windows DVD from someone. It must be the exact version of Windows your PC had–for instance, Windows 7 Home Premium. It also must be a complete version, not an upgrade disc.

After the installation, when it comes time to activate Windows, use the activation number on your PC. It will be on a plate, probably on the back of your desktop PC or the bottom of your laptop. Do not use the activation number on the package the disc came in. If you do, it will either fail or severely inconvenience the friend who lent you the disc.

How to Erase Your Data From an Old Computer or Phone

delete data

If you’re disposing of old documents such as bank statements and tax forms, security experts recommend shredding the paperwork so it can’t be used by identity thieves. Simply deleting the data by emptying the “trash” folder won’t totally wipe all that information away.

Before you dispose of an old personal computer, the experts recommend that the very least you do is reformat your hard drive and reinstall the operating system. A better bet is to wipe your hard drive clean. It’s a practice everyone should be familiar with, since it may be the top recommendation for preventing identity theft.

However, many consumers and organizations are turning to a paperless world, and records once held in filing cabinets are now stored on computer hard drives. But computers eventually get replaced, and old computers are donated, recycled, handed down or refurbished — often with personally identifiable information (PII) still on the machine.

An even easier way to do this, provided the user has Windows Vista or better, is to create a system repair disk and then format the hard drive using the standard format command.

Make sure that the computer technician is one who understands that deleting a file, formatting a hard drive or reinstalling an operating system doesn’t render the data unrecoverable. Those technicians will know enough to identify the proper tools to wipe your drive.

Eliminating personal data from personal computers kept at home is relatively easy. The real problems lie with mobile devices and work computers. Smartphone and tablet owners now store a great deal of personally identifiable information on these devices.

Apps are available to “wipe” the devices if they are lost or stolen, but the technology is still relatively new and these apps leave some data behind. Ideally leave your banking, personal emailing and social networking to your home computer. That way, you can control what happens to your personally identifiable information when the time comes to get rid of your old equipment.

Share your thoughts in the comments below and don’t forget to like this post.

Source: Associated Press


How to Back Up Your Smartphone

backup

Your cellphone is a carefully crafted work of art. Your calendar is color-coded. Your music collection is a meticulously curated mix of your wonderful taste in tunes. You’ve spent days rearranging the icons on your home screen until they’re just right.

So imagine how heartbreaking it’s going to be when you drop that sucker in a toilet — and you will undoubtedly drop that sucker in a toilet someday. It happens to the best of us. Sure, you can get a new phone, but will that replacement ever reach the level of perfection that is your current masterpiece?

Your phone contains more personal data than you may realize. Everything from your alarms to your text messages are evidence of your use habits, let alone private information. By backing up your phone, you not only ensure that your data is protected in the event of theft or damage, but also that you can make a smooth transition when upgrading devices.

Whether you use iOS or Android, you already have the available tools to back up your most

Apple users have two options when it comes to backing up their devices: iCloud and iTunes

iCloud is Apple’s cloud-based storage system. Backing up with iCloud is largely automated and can be done wirelessly over a Wi-Fi connection (though, you can’t use 3G to back up with iCloud) in about five minutes. You only have 5GB of space for free, so power users have to be willing to pony up for more storage.

For users who want more space without having to pay for it, you can use iTunes to back up your iPhone straight to your computer’s hard drive. Now, pro-tip: If you’re backing up your iPhone to a computer that you keep at home (or wherever your iPhone is most often), your data is just as susceptible to fire or theft. You’ll want to make sure that you’re running frequent backups for your computer to ensure that your computer data is safe.

On your iPhone, go to Settings > General > iTunes Wi-Fi Sync and select your computer from the options list. You can then tap “Sync Now” or just plug your phone in and let the screen lock. It’ll sync automatically.

For Android users, Google can go a long way to back up your data. And whatever Google misses, other programs can catch. Google automatically backs up a significant portion of user data to the cloud with the user’s permission. To allow this, go to Settings > Backup & Reset, and then tap “Backup My Data” and “Automatic Restore.” From this screen you can also select the Google account to which you’d like to sync your data.

You can also manually transfer music, pictures and videos from your Android phone straight to your PC via cable. Windows will mount your phone as an external hard drive, while Mac users will have to download Android FileTransfer first. Remember, if you’re storing your files on your computer, you’ll want to use other backup software as well.

Do you use another program or application to back that thang up? Let us know in the comments section below.

Ways to improve your iPhone’s battery life..

iPhone

While the iPhone is booming in popularity, its battery still isn’t that good. But by applying a few system tweaks, you can improve your iPhone’s battery life considerably.

Enterprises and business users love the iPhone because of its back-end management and security features that allow employees to bring their own from home (BYOD) and use it in the workplace. The one thing that lets the device down from full marks is its battery life. Compared to the old business favorite BlackBerry, the iPhone’s battery life is far from comparable.

Here are 15 simple things you can do to make your iPhone run that little bit longer.

1. Turn off auto-brightness: The best practice seems to point to disabling the auto-brightness. Go to Settings > Brightness & Wallpaper > then reduce the brightness to 10-25 percent, or whatever feels comfortable. It may not be easy to read your iPhone’s screen in direct sunlight, and you may not get the most out of your high-resolution display, but this is about conserving your battery rather than anything else.

2. Disable system Location services: Go to Settings > Privacy > Location Services. When On, scroll down to System Services, then uncheck all of these items. When you’re not using Location Services, such as GPS, then simply turn it Off. Location services use GPS for location-aware apps and services. While it’s useful knowing where you are on Google Maps, what you don’t see is what is going on behind the scenes.

Ads are being displayed based on your location, traffic data is being downloaded, and your iPhone is always pinging out to see where you are to keep an eye on which time zone you’re in. All of these things are unnecessary and churn up your battery life.

3. Disable push email: Go to Settings > Mail, Contacts, Calendar > under Fetch New Data set Push to Off — then scroll down and set the ‘fetch’ schedule to Every 15 minutes so that it runs the ‘send and receive’ schedule every quarter-hour. Push email is very useful for when you’re running against the clock. Emails are downloaded automatically and instantly from the server when they arrive, rather than waiting for you to ‘send and receive.’

If you need certain email accounts to push email to your device, select Advanced and confirm the setting for each separate account.

4. Disable Wi-Fi, Bluetooth when you’re out and about: Go to Settings > Wi-Fi > set to Off. Also, go to Settings > Bluetooth > set this to Off.

Wi-Fi and other wireless radios should be disabled when they’re not being used as they use a significant amount of battery life. If you are not near or not using a Wi-Fi hotspot, or sending items to other devices using Bluetooth, these can and should be turned off.

5. Enable Wi-Fi while you’re at work: Go to Settings > Wi-Fi > and set to On. Also, set Ask to Join Networks to Off to keep that Wi-Fi hotspot connected.

However, if you are at work or at home, and you’re in a building where cellular signal is weak — such as a thick-walled house or a city apartment — you might find it helps your iPhone’s battery life by actually leaving Wi-Fi turned on. Anecdotal reports suggest that when your iPhone has good cellular signal, the device’s battery will remain at a relatively stable discharge rate.

6. Disable unnecessary push notifications: Go to Settings > Notifications.  Applications use notifications to inform you of what’s going on in the world, such as new email, text messages, reminders and who is responding to you on social networks. But these notifications turn the iPhone’s display on, and often include audio and vibrations.

But these can still be included in the Notification Center so these can be checked when you periodically check your phone.

7. Reduce auto-lock period: Go to Settings > General > Auto-Lock > set this to 1 Minute or 2 Minutes. Reducing how long it takes for your iPhone to turn its display off helps conserve the battery life. This means the display can quietly chip away at the device’s battery life while it’s not actively being used.

8. Disable vibrations: Go to Settings > Sounds and select whether or not you want to enable vibration when your phone rings, or if you want it enabled while it is set to silent.

Vibrations are useful to enable, particularly when you’re working in loud environments or even very quiet ones, so you can leave your iPhone on silent and receive a buzz in your pocket when a new message or notification has come through. A physical motor spinning in your device causes these vibrations, but this uses precious battery life. These can be limited or disabled altogether.

9. Disable 4G (and LTE) connectivity: Go to Settings > General > Cellular > Set Enable 4G (or Enable LTE) to Off. While 4G is much faster than 3G cellular connectivity, it uses a lot more battery power.

10. Close unused or dormant apps regularly: On your iPhone in an unlocked state, double-press the Home button > touch and hold any open app until it enters a ‘wiggly’ state > then tap the red close button on each app that you no longer need. You can then return to your device by pressing the Home button again. When using memory or battery intensive applications, these are still churning up power in the background.

11. Install a battery-monitoring app: There are plenty of applications in the App Store that monitor battery usage, but install only one. iPhones do not contain this feature, leading many to third-party apps to monitor device usage in order to extend the battery life.

12. Be aware of where you put your iPhone: An iPhone will generate heat depending on what it is being used for, so keeping it at a level temperature is important. The warmer your iPhone gets, the faster the battery will deplete. Sometimes it’s better to keep your iPhone out of your pocket and carry it in your bag — carefully to ensure the screen or case doesn’t get knocked about or damaged — or even clipped to your belt.

13. Check for iOS updates regularly for unfixable bugs: In some cases, software bugs have led to complaints that battery life decreases quicker than normal.

14. Pick up your phone less: While it is often tempting to pick up your phone and check to see if there are any messages, notifications, or missed calls, one of the easiest ways of keeping your battery ticking over is to stop picking it up every few minutes. Putting your phone to ‘sleep’ and ‘waking’ it up will drain battery life.

15. Cheat, and buy an external battery: If all else fails and battery life continues to be a problem, consider an external battery pack. Some external batteries will extend the battery life of your iPhone for twice the ordinary length, if not longer.

Share your thoughts in the comments below and don’t forget to like this post.

Source: Associated Press

Five surefire ways to maximize your laptop’s battery life

battery life cycle

You adore your laptop. It lets you get down to business wherever you happen to be—airport lounge, coffee shop, your home office. It’s the key to your competitive edge.

That is, until its battery croaks. Just as you’re putting the final details on your PowerPoint presentation. At the airport. Two hours before takeoff. And with no power outlet in sight. At that instant, you begin to wonder why you ever bought the ever-lovin’ boat anchor in the first place.

But love will bloom anew as soon as you recharge. Avoid the heartache, however temporary: Follow these five tips for maximizing your laptop’s run time.

1. Plug in whenever possible

One surefire way to ensure that your laptop is always ready for action is to plug it into an AC outlet whenever possible. Keeping the machine fully charged makes it far more likely that you will always have the juice you need to complete your work. Purchase at least one extra AC adapter, so you’ll always have one in your office and one in your laptop bag for travel. If you work at home frequently, consider buying a third adapter to leave there.

Terminate the offending process by right-clicking it and selecting ‘Kill Process

A common misconception about laptops is that leaving the system plugged into AC power continuously will overcharge or shorten the life of its battery. Given that the lithium cells used in modern laptops will either catch fire or explode if overcharged, this is obviously not true. Lithium ion batteries stop charging once they reach full capacity, and keeping the battery charged reduces wear and tear on the power source, lengthening its useful life span.

2. Adjust the screen brightness

Modern displays with LED backlights are a major improvement over the CCFL (cold cathode fluorescent tube) backlit displays of yesteryear, in terms of both picture quality and power efficiency. Still, a laptop’s display claims a significant percentage of the power that the system consumes. As such, keeping the screen backlight low can increase your laptop’s run time noticeably. You should also take care in choosing where you work: A low backlight setting will be far more comfortable in a café with soft lighting than in a brightly lit room.

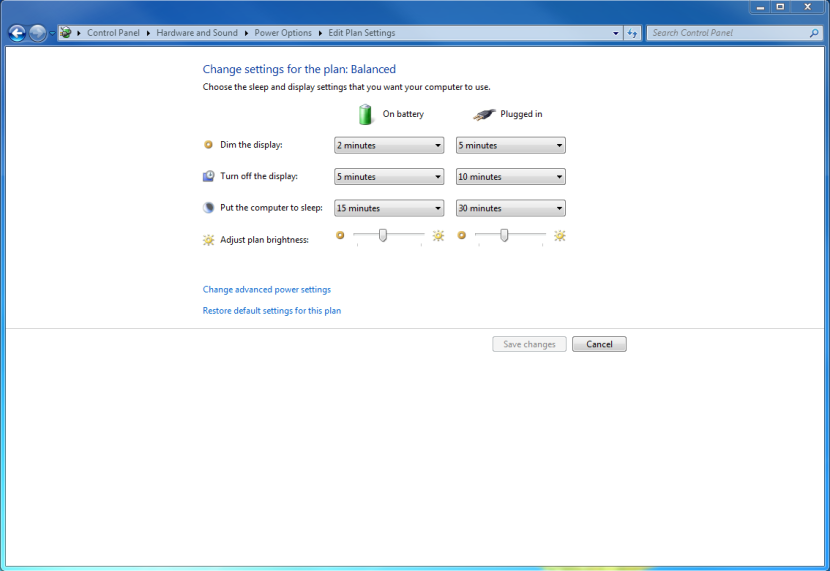
windowspoweroptions

Another way to reduce the power the display consumes is to tweak the automatic backlight controls in Windows. Open Control Panel, choose Hardware and Sound > Power Options, and click Change plan settings for the active power plan. Choosing an aggressive timeout of 1 to 3 minutes under the ‘Dim the display’ and ‘Turn off the display’ options while the machine is operating on battery power will eke out more battery life by dimming or switching off the screen after the specified amount of inactivity. You can also click the Change advanced power settings option to set the level of brightness when the laptop is in the dimmed state.

3. Track down errant apps

One culprit often responsible for draining the battery ahead of its time is the presence of errant software applications that suck up disproportionate processor cycles. Unnecessary utilities running in the background, or an app that is hanging, can also cause this effect. Web browsers are particularly prone to the latter problem, due to the multiple plug-ins, rendering engines, and scripting engines embedded within them.

Modern CPUs save power by dynamically scaling back their clock speed to the minimum possible, but they can do so only when apps aren’t active. If you fail to deal with rogue apps, they will not only drain battery power—they might also slow down your entire system. One clue to the existence of an errant app is if your laptop fan frequently kicks into high gear when the machine should be idle.

Resolving the problem is relatively straightforward: Press the Ctrl-Alt-Delete key combination, launch Windows Task Manager, and use it to identify processes that are showing unexplained high utilization. If a program won’t exit normally, terminate the offending process by right-clicking it and selecting Kill Process. For Web browsers, shutting off all instances usually works. Should all else fail, perform a system restart.

4. Disable intensive background apps

Errant apps aside, applications that make intensive use of the processor or network should remain closed when your laptop isn’t plugged in. Peer-to-peer software such as BitTorrent clients and computationally intensive applications such as distributed-computing projects (Folding@Home, for example) are out. You can also confirm that Windows Update and other software updaters are not attempting to download large software patches.

Disabling automatic Windows Update functions outright is too draconian (particularly if you forget to reinstate the feature later), but periodically checking on your network usage for unexplained spikes will allow you to identify and stop large file transfers before they gobble up precious minutes of battery life.

5. Disable unneeded devices

You can disable unneeded hardware devices or ports to squeeze out a few more minutes of power, although this option isn’t possible with every laptop. Start by disabling unneeded wireless capabilities, such as built-in data modems and Wi-Fi and Bluetooth radios (many laptops have hardware switches for this purpose).

The optical-disc drive is another power guzzler that can drain batteries fast, so don’t leave a DVD or Blu-ray disc in the drive if you don’t need it. Finally, many laptops these days come with backlit keyboards; these are great when you’re in a dark environment, but you can save precious power by doing without the feature when your laptop is running on battery power.

Have we missed any great tips? How do you ensure that your laptop is up for the long haul? Please share in the comments section below.

Source: Associated Press

How to securely wipe sensitive files–or your entire hard drive

Security

When you delete a file, it doesn’t actually go away–even after you’ve emptied the Recycle Bin. The actual bits remain written on the drive until some other disk activity writes over them. Even when you format a drive, the files are still there for those who want and know how to read them.

If you want to truly and securely delete a file, or the contents of an entire drive, you need software that will overwrite the space where the file(s) once sat. Fortunately, several free programs can do this.

First, we recommend Eraser, which integrates with Windows Explorer. Once it’s installed, you can just right-click a file or folder and select Eraser. There’s even an option to erase the file the next time you boot–handy if Windows won’t let you erase it now.

Another option: Delete the files the conventional way, empty the recycle bin, then use CCleaner to overwrite your drive’s free space. This extremely useful tool can do all sorts of Windows scrubbing chores. You’ll find CCleaner’s Drive Wiper tool in the Tools tab.

Both of these programs offer various wiping techniques that overwrite the drive space multiple times. The implication, of course, is that overwriting a file 35 times is more secure than overwriting it only once.

Something else to think about: If you have sensitive files that you’ll eventually want to securely delete, you should encrypt them now.